Middleware is software that's assembled into an app pipeline to handle requests and responses. Each component:
- Chooses whether to pass the request to the next component in the pipeline.
- Can perform work before and after the next component in the pipeline.
Request delegates are used to build the request pipeline. The request delegates handle each HTTP request.
Request delegates are configured using Run, Map, and Use extension methods. An individual request delegate can be specified in-line as an anonymous method (called in-line middleware), or it can be defined in a reusable class. These reusable classes and in-line anonymous methods are middleware, also called middleware components. Each middleware component in the request pipeline is responsible for invoking the next component in the pipeline or short-circuiting the pipeline. When a middleware short-circuits, it's called a terminal middleware because it prevents further middleware from processing the request.
Create a middleware pipeline with WebApplication
The ASP.NET Core request pipeline consists of a sequence of request delegates, called one after the other. The following diagram demonstrates the concept. The thread of execution follows the black arrows.
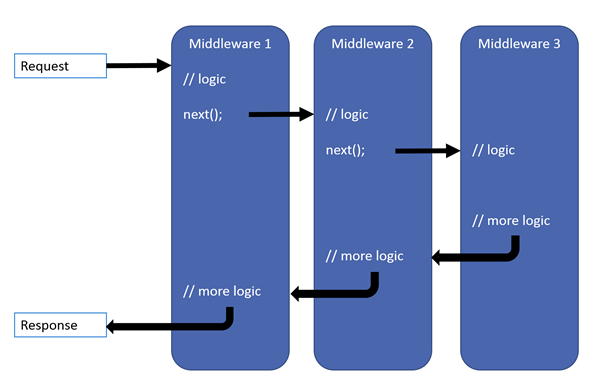
Each delegate can perform operations before and after the next delegate. Exception-handling delegates should be called early in the pipeline, so they can catch exceptions that occur in later stages of the pipeline.
The simplest possible ASP.NET Core app sets up a single request delegate that handles all requests. This case doesn't include an actual request pipeline. Instead, a single anonymous function is called in response to every HTTP request.
In the preceding code:
- Middleware that is not added when creating a new web app with individual users accounts is commented out.
- Not every middleware appears in this exact order, but many do. For example:
UseCors,UseAuthentication, andUseAuthorizationmust appear in the order shown.UseCorscurrently must appear beforeUseResponseCaching. This requirement is explained in GitHub issue dotnet/aspnetcore #23218.UseRequestLocalizationmust appear before any middleware that might check the request culture, for example,app.UseStaticFiles().- UseRateLimiter must be called after
UseRoutingwhen rate limiting endpoint specific APIs are used. For example, if the [EnableRateLimiting] attribute is used,UseRateLimitermust be called afterUseRouting. When calling only global limiters,UseRateLimitercan be called beforeUseRouting.
The following Program.cs code adds middleware components for common app scenarios:
- Exception/error handling
- When the app runs in the Development environment:
- Developer Exception Page Middleware (UseDeveloperExceptionPage) reports app runtime errors.
- Database Error Page Middleware (UseDatabaseErrorPage) reports database runtime errors.
- When the app runs in the Production environment:
- Exception Handler Middleware (UseExceptionHandler) catches exceptions thrown in the following middlewares.
- HTTP Strict Transport Security Protocol (HSTS) Middleware (UseHsts) adds the
Strict-Transport-Securityheader.
- When the app runs in the Development environment:
- HTTPS Redirection Middleware (UseHttpsRedirection) redirects HTTP requests to HTTPS.
- Static File Middleware (UseStaticFiles) returns static files and short-circuits further request processing.
- Cookie Policy Middleware (UseCookiePolicy) conforms the app to the EU General Data Protection Regulation (GDPR) regulations.
- Routing Middleware (UseRouting) to route requests.
- Authentication Middleware (UseAuthentication) attempts to authenticate the user before they're allowed access to secure resources.
- Authorization Middleware (UseAuthorization) authorizes a user to access secure resources.
- Session Middleware (UseSession) establishes and maintains session state. If the app uses session state, call Session Middleware after Cookie Policy Middleware and before MVC Middleware.
- Endpoint Routing Middleware (UseEndpoints with MapRazorPages) to add Razor Pages endpoints to the request pipeline.

In the preceding example code, each middleware extension method is exposed on WebApplicationBuilder through the Microsoft.AspNetCore.Builder namespace.
UseExceptionHandler is the first middleware component added to the pipeline. Therefore, the Exception Handler Middleware catches any exceptions that occur in later calls.
Static File Middleware is called early in the pipeline so that it can handle requests and short-circuit without going through the remaining components. The Static File Middleware provides no authorization checks. Any files served by Static File Middleware, including those under wwwroot, are publicly available. For an approach to secure static files, see Static files in ASP.NET Core.
If the request isn't handled by the Static File Middleware, it's passed on to the Authentication Middleware (UseAuthentication), which performs authentication. Authentication doesn't short-circuit unauthenticated requests. Although Authentication Middleware authenticates requests, authorization (and rejection) occurs only after MVC selects a specific Razor Page or MVC controller and action.
In ASP.NET Core, you can add custom middleware to the request pipeline by creating a middleware class and then registering it in the Configure method of the Startup class. Here’s how you can do it step-by-step:
Step 1: Create the Middleware Class
Create a middleware class that defines the logic you want to execute as part of the request pipeline. The middleware class typically includes a constructor that accepts a RequestDelegate and an Invoke method that handles the HTTP request.
public class CustomMiddleware
{
    private readonly RequestDelegate _next;

    public CustomMiddleware(RequestDelegate next)
    {
        _next = next;
    }

    public async Task InvokeAsync(HttpContext context)
    {
        // Logic before calling the next middleware
        await context.Response.WriteAsync("Custom Middleware Before\n");

        // Call the next middleware in the pipeline
        await _next(context);

        // Logic after calling the next middleware
        await context.Response.WriteAsync("Custom Middleware After\n");
    }
}
Step 2: Register the Middleware in the Startup Class
Register the custom middleware in the Configure method of the Startup class using the UseMiddleware extension method.
public class Startup
{
    public void Configure(IApplicationBuilder app, IWebHostEnvironment env)
    {
        if (env.IsDevelopment())
        {
            app.UseDeveloperExceptionPage();
        }
        else
        {
            app.UseExceptionHandler("/Home/Error");
            app.UseHsts();
        }

        app.UseHttpsRedirection();
        app.UseStaticFiles();
        app.UseRouting();
        app.UseAuthentication();
        app.UseAuthorization();

        // Register custom middleware
        app.UseMiddleware<CustomMiddleware>();

        app.UseEndpoints(endpoints =>
        {
            endpoints.MapControllers();
        });
    }
}
Step 3: Run the Application
Run your ASP.NET Core application. When a request is processed, your custom middleware will be invoked as part of the pipeline. The output will include the messages from the custom middleware.
Example Middleware Pipeline
Here’s a full example with additional built-in middleware components for context:
public class Startup
{
    public void Configure(IApplicationBuilder app, IWebHostEnvironment env)
    {
        if (env.IsDevelopment())
        {
            app.UseDeveloperExceptionPage();
        }
        else
        {
            app.UseExceptionHandler("/Home/Error");
            app.UseHsts();
        }

        app.UseHttpsRedirection();
        app.UseStaticFiles();
        app.UseRouting();
        app.UseAuthentication();
        app.UseAuthorization();

        // Custom middleware
        app.UseMiddleware<CustomMiddleware>();

        app.UseEndpoints(endpoints =>
        {
            endpoints.MapControllers();
        });
    }
}

public class CustomMiddleware
{
    private readonly RequestDelegate _next;

    public CustomMiddleware(RequestDelegate next)
    {
        _next = next;
    }

    public async Task InvokeAsync(HttpContext context)
    {
        // Logic before calling the next middleware
        await context.Response.WriteAsync("Custom Middleware Before\n");

        // Call the next middleware in the pipeline
        await _next(context);

        // Logic after calling the next middleware
        await context.Response.WriteAsync("Custom Middleware After\n");
    }
}
Using Inline Middleware
Alternatively, you can add inline middleware directly in the Configure method without creating a separate class:
public void Configure(IApplicationBuilder app, IWebHostEnvironment env)
{
    if (env.IsDevelopment())
    {
        app.UseDeveloperExceptionPage();
    }
    else
    {
        app.UseExceptionHandler("/Home/Error");
        app.UseHsts();
    }

    app.UseHttpsRedirection();
    app.UseStaticFiles();
    app.UseRouting();
    app.UseAuthentication();
    app.UseAuthorization();

    // Inline middleware
    app.Use(async (context, next) =>
    {
        // Logic before calling the next middleware
        await context.Response.WriteAsync("Inline Middleware Before\n");

        // Call the next middleware in the pipeline
        await next.Invoke();

        // Logic after calling the next middleware
        await context.Response.WriteAsync("Inline Middleware After\n");
    });

    app.UseEndpoints(endpoints =>
    {
        endpoints.MapControllers();
    });
}