Fundamentals Of Low-Level System Design
Low-Level System Design (LLD) delves into the intricate details of a system's components and their interactions. It bridges the gap between high-level design, which defines the overall architecture, and actual implementation. Here are some core fundamentals of LLD:
Focus on Individual Components:
- LLD focuses on designing individual classes, objects, and their relationships.
- It dives deep into data structures, algorithms, APIs, and error handling within each component.
- The goal is to ensure efficient and maintainable implementation of individual functionalities.
Object-Oriented Principles:
- LLD heavily relies on object-oriented principles like encapsulation, inheritance, polymorphism, and abstraction.
- This ensures clear separation of concerns, code reusability, and flexibility for future modifications.
SOLID Principles:
- Following SOLID principles (Single Responsibility, Open-Closed, Liskov Substitution, Interface Segregation, Dependency Inversion) leads to clean, modular, and adaptable code.
- These principles emphasize loose coupling, high cohesion, and easy to understand components.
Data Structures and Algorithms:
- LLD involves choosing appropriate data structures (e.g., arrays, linked lists, trees) to store and manipulate data efficiently.
- Selecting suitable algorithms (e.g., sorting, searching, graph traversal) is crucial for optimizing performance and achieving desired functionality.
APIs and Error Handling:
- LLD defines clear APIs for communication between components and external systems.
- Robust error handling mechanisms are essential to anticipate and gracefully handle potential issues.
Performance and Scalability:
- LLD considers potential bottlenecks and optimizes components for efficiency and responsiveness.
- It also evaluates the system's scalability to handle increasing loads and future growth.
Documentation and Collaboration:
- Comprehensive documentation outlining the design decisions, data structures, algorithms, and APIs is crucial for clarity and collaboration.
- Effective communication and collaboration with developers and stakeholders throughout the LLD process are essential for successful implementation.
Tools and Techniques:
- Utilize UML diagrams, flowcharts, and pseudocode to visually represent the system's components and interactions.
- Design patterns, like Observer, Singleton, and Factory, can be leveraged to build reliable and reusable code.
- Performance profiling tools can identify bottlenecks and guide optimization efforts.
Remember, LLD is an iterative process, and refining the design based on feedback and testing is crucial. By mastering these fundamentals and using appropriate tools and techniques, you can develop efficient, maintainable, and scalable low-level systems.
Basics of OOPS
In the programming world, the programming languages are divided into multiple categories (Procedural Programming Languages, Functional Programming Languages, Object-Oriented Programming Languages, Scripting Programming Languages, and Logic Programming Languages). In this article, we are going to discuss object-oriented programming languages.
OOP stands for Object-Oriented Programming. It refers to a programming methodology that supports objects rather than just functions and procedures. In Object-Oriented Programming, the object is a first-class citizen. That means everything is an object in Object-Oriented Programming. As we know, an object is a real-world entity (Books, Pens, Tables, Animals, Humans, etc.) that has its own state, behaviour, and identity characteristics that make it different from the others.

In OOP, these objects are organized into classes, which allow individual objects' characteristics to be grouped together. A class is a template that is used to group the characteristics of an object, and an instance of that class is called an object, which has its own characteristics. Let's take the example of Pan. Here, the pen is an object category that is used to group the characteristics of the pan objects. So, each Pan has its own state, identity, and behaviour, which are grouped into a single unit by using the Pen class. I have two ball pens. One is the Cello Writo-Meter (Blue, Full) and another is the Cello Finegrip (Red, Half). Here, both pens are two different objects with the same types of characteristics. The Cello Writo-Meter and the Cello Finegrip are the identities of the two pens. The blue and red colors represent their behaviours, and full and half represent the state of both pens, respectively.
Let' practically implement this example with the help of C# programming language:

Encapsulation implementation in C#
In C#, Encapsulation is a principle of wrapping data (fields) and code (methods and properties) together as a single unit. In object-oriented programming, Encapsulation is the first, and main principle that is required to protect the data members of an object.
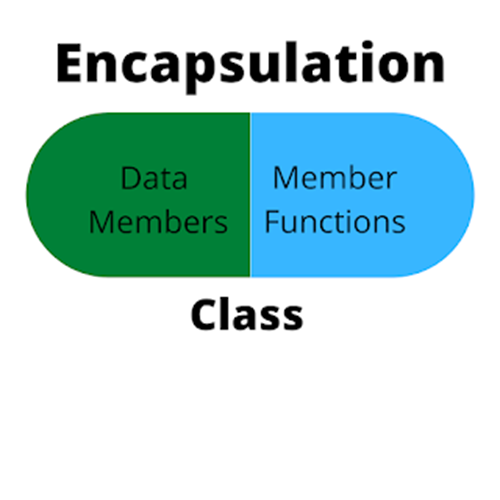
Why Encapsulation is needed?
This concept is often used to hide the internal representation, or state, of an object from the outside, which helps to protect data from being corrupted.
How to implement Encapsulation in C#?
With the help of access specifies (public, private, protracted, etc.) we bind data members, methods, and properties that operate on it into a single unit. For an example:

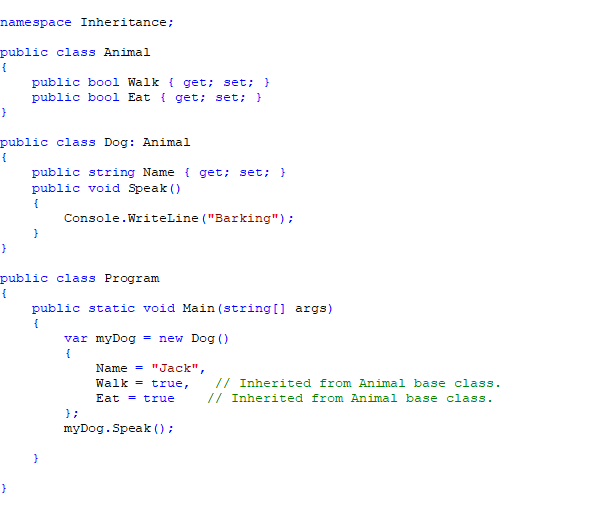
Inheritance implementation in C#
In object-oriented programming, Inheritance is one of the most important concepts because it allows the creation of hierarchical classifications. It is the mechanism by which one class is allowed to inherit the features (fields, properties, indexers, and methods) of another class. It provides the ability to reuse the same code, instead of writing the same code again and again.
In C#, a class that is inherited is called a base class. The class that does the inheriting is named a derived class. Therefore, a derived class is a specialized version of a base class. It inherits all of the fields, methods, properties, and indexers defined by the base class (except private members) and adds its own unique elements.
Inheritance supports the concept of reusability. When we want to create a new class and there is already a class that includes some common code that we want, we can derive our new class from the existing class. By doing this, we are reusing the fields, methods, properties, and indexers of the existing class.
In C#, we can inherit a class with the help of the colon operator (:).
C# supports the following four types of inheritance:
- Single Inheritance.
- Multilevel Inheritance.
- Hierarchical Inheritance.
- Multiple Inheritance (only with interfaces).

Single Inheritance
In a single-level inheritance, there is one base class and one derived class, as given below:

Here, class B is derived from class A. Let's take an example to implement this in C#:
Multi-level Inheritance
In a multi-level inheritance, A class is derived from another class in a chain way, as given below:

Here, class B is derived from class A, and further class C is derived from class B. Let's take an example to implement this in C#:

Hierarchical Inheritance
In a hierarchical inheritance, multiple classes are derived from the same base class, as given below:

Here, both class B and C are derived from class A. Let's take an example to implement this in C#:

Multiple Inheritances
In multiple inheritances, a class has multiple base classes. C# doesn't allow to inherit multiple classes, but allows to inherit multiple interfaces with or without a single base class, as given below:

Here, class C is derived from class A and interface IB. C# compiler is designed not to support multiple inheritance because it causes ambiguity of methods from different base class. Let's take an example to implement this in C#:

Polymorphism implementation in C#
In object-oriented programming, Polymorphism is the ability of an object to take on many forms. It allows us to perform a single action in different ways.
In C#, Polymorphism is an ability to process objects differently depending on their data type or class. More specifically, it's the flexibility to redefine methods for derived classes.
Why Polymorphism is needed?
Polymorphism helps us to reuse the code, that is once written, to be tested and implemented. It also helps us to achieve abstraction in our application code, which increases our code reusability and readability.
Types of Polymorphism
There are two types of polymorphism:
- Static (Compile-time) polymorphism.
- Dynamic (Run-time) polymorphism.
Static Polymorphism
Static polymorphism is a polymorphism that occurs at compile time, in which the linking of a method with an object is resolved at compile time.
In C#, Method and operator overloading are an example of static polymorphism. Let's take an example to implement this in C#:
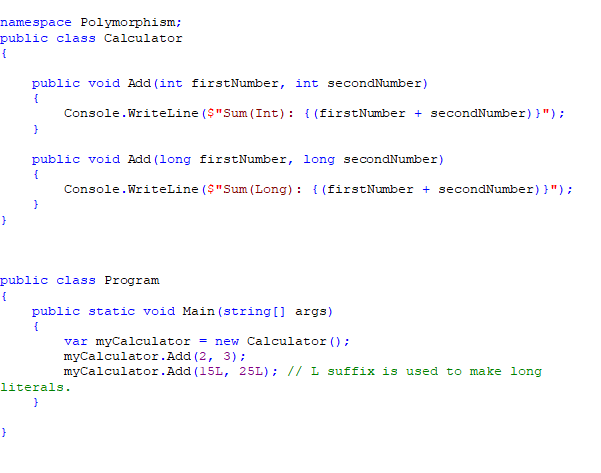
In the preceding example, we have defined two methods with the same name Add() but with different input parameter types.
Dynamic Polymorphism
Dynamic polymorphism is a polymorphism that occurs during the application execution, in which the linking of a method with an object is resolved just before that method execution (While invoking that method). The method overriding is an example of dynamic polymorphism. Here, a call to an overridden method is resolved at runtime. It allows us to redefine a method to provide its new definition.
In C#, dynamic polymorphism is accomplished by using abstract and virtual methods. Let's take an example to implement this in C#:
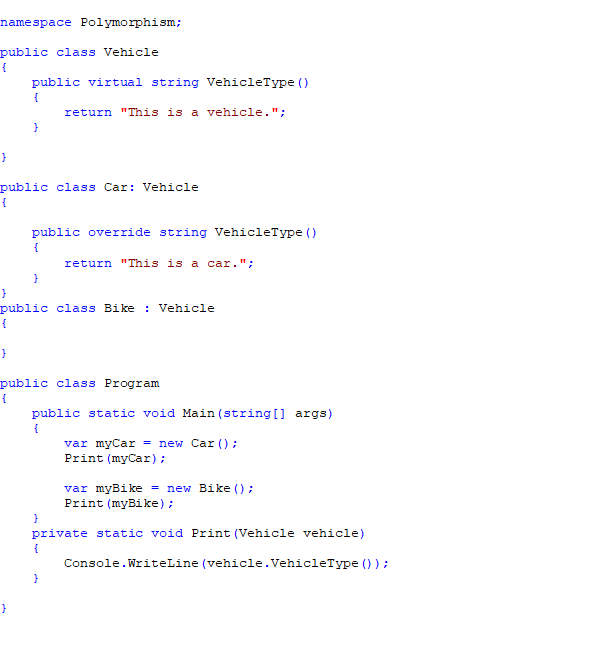
In the preceding example, the response of the VehicleType() method will be determined at run-time based on the overridden version of it.
One more example:

Abstraction implementation in C#
In object-oriented programming, Abstraction is the process of hiding certain details and showing only essential information to the user.
Why Abstraction is needed?
Abstraction allows us to create a general idea of what the problem is and how to solve it. The process instructs us to remove all specific detail and any patterns that will not help us solve our problem.
In C#, Abstraction can be achieved by using Abstract Class(es) and Interface(s). Let's take an example to implement this with C#:

In the preceding example, we have achieved abstraction with the help of the IDevice interface, which is implemented by the Android, IPhone, and Window concrete classes. So, to keep abstraction between concrete implementation and users, we used a DeviceManager class, which is responsible to provide the instance of the specific device based on provided device type. In the DeviceManager class, the GetDevice() method returns an instance of the IDevice interface type instead of concrete classes (Android, IPhone, and Window).
Here, the users don't know about concrete implementation, they know about the problem and how to solve it.
The S.O.L.I.D Principles
The S.O.L.I.D principles are a set of guidelines for designing and writing object-oriented code that is easy to maintain, extend, and reuse. The acronym stands for:
· Single-responsibility principle: A class should have only one reason to change, meaning that it should have only one responsibility or job.
· Open-closed principle: A class should be open for extension, but closed for modification, meaning that it should allow adding new features without changing the existing code.
· Liskov substitution principle: A subclass should be able to replace its superclass without breaking the functionality, meaning that it should follow the contract of the superclass and not introduce any unexpected behavior.
· Interface segregation principle: A class should not depend on methods that it does not use, meaning that it should have multiple, specific interfaces rather than one general interface.
· Dependency inversion principle: A class should depend on abstractions rather than concretions, meaning that it should rely on interfaces or abstract classes rather than concrete classes.

To illustrate these principles, let’s look at some examples in C#.
Single-responsibility principle:
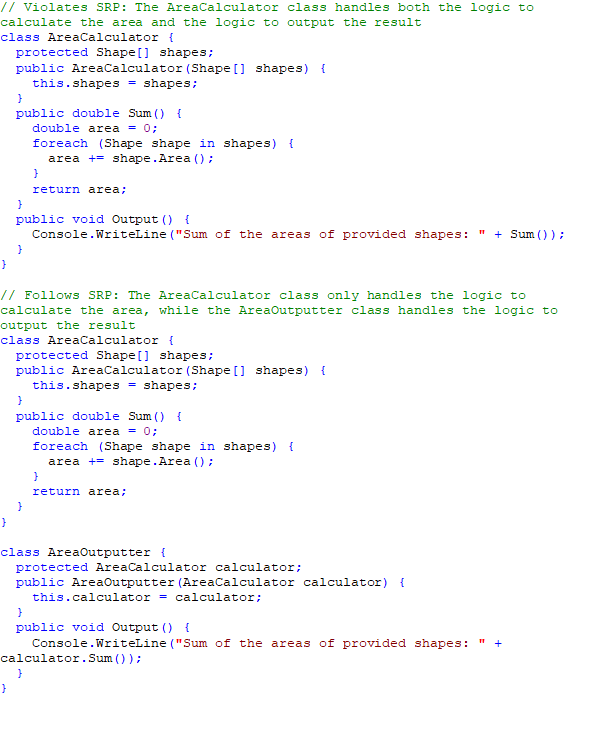
Open-closed principle:

Liskov substitution principle:
// Violates LSP: The Rectangle class is a subclass of the Square class, but it changes the behavior of the SetWidth and SetHeight methods, which breaks the functionality of the AreaCalculator class

class Square {

  protected double width;

  protected double height;

  public Square(double side) {

    width = height = side;
  }

  public virtual void SetWidth(double width) {

    this.width = width;

    height = width;

  }

  public virtual void SetHeight(double height) {

    this.height = height;

    width = height;

  }

  public double Area() {

    return width * height;

  }

}

class Rectangle : Square {

  public Rectangle(double width, double height) : base(width) {

    this.width = width;

    this.height = height;

  }

  public override void SetWidth(double width) {

    this.width = width;

  }

  public override void SetHeight(double height) {

    this.height = height;

  }

}

class AreaCalculator {

  protected Square[] shapes;

  public AreaCalculator(Square[] shapes) {

    this.shapes = shapes;

  }

  public double Sum() {

    double area = 0;

    foreach (Square shape in shapes) {

      area += shape.Area();

    }

    return area;

  }

}
// Follows LSP: The Rectangle class and the Square class are both subclasses of the Shape class, which defines the contract for the Area method, and they do not change the behavior of the superclass
abstract class Shape {

  public abstract double Area();

}


class Square : Shape {

  protected double side;

  public Square(double side) {

    this.side = side;

  }

  public override double Area() {

    return Math.Pow(side, 2);

  }

}

class Rectangle : Shape {

  protected double width;

  protected double height;

  public Rectangle(double width, double height) {

    this.width = width;
    this.height = height;

  }

  public override double Area() {

    return width * height;

  }

}


class AreaCalculator {

  protected Shape[] shapes;

  public AreaCalculator(Shape[] shapes) {

    this.shapes = shapes;

  }

  public double Sum() {

    double area = 0;

    foreach (Shape shape in shapes) {

      area += shape.Area();

    }
    return area;

  }

}
Interface segregation principle:
// Violates ISP: The Worker class depends on the IWorker interface, which contains methods that it does not use

interface IWorker {

  void Work();

  void Eat();

}

class Worker : IWorker {

  public void Work() {

    // ...working

  }

  public void Eat() {

    // ...eating

  }

}

class Robot : IWorker {

  public void Work() {

    // ...working

  }

  public void Eat() {

    // ...not eating

  }

}
// Follows ISP: The Worker class and the Robot class depend on separate interfaces that contain only the methods that they use

interface IWorkable {

  void Work();

}

interface IFeedable {

  void Eat();

}

class Worker : IWorkable, IFeedable {

  public void Work() {

    // ...working

  }

  public void Eat() {

    // ...eating

  }

}

class Robot : IWorkable {

  public void Work() {

    // ...working

  }

}
Dependency inversion principle:
// Violates DIP: The PasswordReminder class depends on the MySQLConnection class, which is a concrete class

class MySQLConnection {

  public void Connect() {

    // ...connect to MySQL database

  }

}

class PasswordReminder {

  private MySQLConnection dbConnection;

  public PasswordReminder(MySQLConnection dbConnection) {

    this.dbConnection = dbConnection;

  }

  public void SendPasswordReminder() {

    dbConnection.Connect();

    // ...send password reminder

  }

}
// Follows DIP: The PasswordReminder class depends on the IDatabaseConnection interface, which is an abstraction

interface IDatabaseConnection {

  void Connect();

}

class MySQLConnection : IDatabaseConnection {

  public void Connect() {

    // ...connect to MySQL database

  }

}

class PasswordReminder {

  private IDatabaseConnection dbConnection;

  public PasswordReminder(IDatabaseConnection dbConnection) {

    this.dbConnection = dbConnection;
  }
  public void SendPasswordReminder() {

    dbConnection.Connect();
    // ...send password reminder
  }
}
DRY Principle
DRY stands for “Don’t Repeat Yourself”, which means that you should avoid writing the same code or logic more than once in your application. This can help you make your code more maintainable, readable, and reusable.
Why DRY principal is important?
· Improved Maintainability: Changes need to be made in only one place, reducing the risk of inconsistencies and bugs.
· Enhanced Readability: Code is cleaner and easier to understand when not cluttered with repetitions.
· Easier Refactoring and Scaling: With a single source of truth, it’s easier to modify and expand the system.
The DRY principle can be applied to different aspects of software development, such as code, configuration, documentation, and user interface. For example, if you have a piece of code that performs some calculation or validation, you should extract it into a method and call it from different places, rather than repeating the same code in multiple locations. This way, if you need to change the logic or fix a bug, you only need to modify the method once, rather than updating every occurrence of the code.
Similarly, if you have some constants or settings that are used throughout your application, you should store them in a single place, such as a configuration file or a class, rather than hard-coding them in different places. This way, if you need to change the value of a constant or a setting, you only need to update it in one place, rather than searching and replacing it in multiple files.
The DRY principle can also be applied to documentation and user interface. For example, if you have some information or instructions that are relevant to multiple parts of your application, you should document them in a single place, such as a wiki or a help page, rather than repeating them in different places. This way, if you need to update the information or instructions, you only need to edit the document once, rather than modifying every copy of the text.
Similarly, if you have some common elements or components that are used in multiple parts of your user interface, such as buttons, menus, or dialogs, you should create them as reusable components and use them in different places, rather than creating them from scratch every time. This way, if you need to change the appearance or behavior of an element or a component, you only need to modify the component once, rather than changing every instance of the element.
Using methods: Methods implement the DRY principle by allowing you to centralize code that will be used in multiple places. For example, if you have a code that calculates the area of a circle, you should create a method that takes the radius as a parameter and returns the area, rather than repeating the formula in different places.
// Violates DRY: The formula for the area of a circle is repeated in different places
double area1 = Math.PI * Math.Pow(5, 2); // area of a circle with radius 5
double area2 = Math.PI * Math.Pow(10, 2); // area of a circle with radius 10
double area3 = Math.PI * Math.Pow(15, 2); // area of a circle with radius 15
// Follows DRY: The formula for the area of a circle is extracted into a method

double AreaOfCircle(double radius) {
  return Math.PI * Math.Pow(radius, 2);
}
double area1 = AreaOfCircle(5); // area of a circle with radius 5
double area2 = AreaOfCircle(10); // area of a circle with radius 10
double area3 = AreaOfCircle(15); // area of a circle with radius 15
Using classes and inheritance: When lines of code are spread across many classes and methods, they can be relocated to a base class or a shared class. For example, if you have a code that validates an email address, you should create a class that contains the validation logic and use it in different classes, rather than repeating the validation code in different places.
// Violates DRY: The code for validating an email address is repeated in different classes
class Customer {

  public string Email { get; set; }

  public bool IsValid() {

    // ...some code to validate other properties

    // validate email address

    if (string.IsNullOrEmpty(Email)) return false;

    if (!Email.Contains("@")) return false;

    // ...some more code to validate email address

    return true;

  }

}

class Employee {

  public string Email { get; set; }

  public bool IsValid() {

    // ...some code to validate other properties

    // validate email address

    if (string.IsNullOrEmpty(Email)) return false;

    if (!Email.Contains("@")) return false;

    // ...some more code to validate email address

    return true;
  }

}

// Follows DRY: The code for validating an email address is extracted into a class

class EmailValidator {

  public static bool IsValid(string email) {

    // validate email address

    if (string.IsNullOrEmpty(email)) return false;
    if (!email.Contains("@")) return false;

    // ...some more code to validate email address

    return true;
  }

}

class Customer {

  public string Email { get; set; }

  public bool IsValid() {
    // ...some code to validate other properties
    // use the email validator class
    return EmailValidator.IsValid(Email);

  }

}

class Employee {

  public string Email { get; set; }

  public bool IsValid() {
    // ...some code to validate other properties
    // use the email validator class
    return EmailValidator.IsValid(Email);
  }

}
Tips for Practicing DRY
· Use Functions and Classes: Encapsulate repeated logic in functions or classes.
· Leverage Inheritance and Composition: In object-oriented programming, use inheritance and composition to reuse code.
· Employ Templates and Libraries: Wherever possible, use templates or libraries that offer common functionalities.
The YAGNI Principle
YAGNI (You Aren't Gonna Need It) is a mantra in software development that encourages developers to implement things only when they are necessary.
Understanding YAGNI
YAGNI, an acronym for "You Aren't Gonna Need It", is a principle that recommends against adding functionality until it is deemed necessary.
Ron Jeffries, one of the creators of Extreme Programming, coined this term to prevent over-engineering and to keep software development as efficient and straightforward as possible.
The Benefits of YAGNI
- Reduces Complexity: By not adding unnecessary features, the codebase remains simpler and more manageable.
- Saves Time and Resources: Time is not wasted on features that may never be used, allowing more focus on the current requirements.
- Easier Maintenance: Fewer features mean less code to test and maintain.
- Increases Flexibility: Without unnecessary code, it is easier to adapt the software to new requirements.
Implementing YAGNI: Practical Examples
Example 1: Avoiding Premature Generalization
Non-YAGNI Approach:
Imagine you are building a blog platform and decide to implement a complex tagging system that allows nested tags, even though the initial requirements only mention simple tags.
YAGNI Approach:
You implement a straightforward tagging system that meets the current requirements. If, in the future, the need for nested tags arises, you can extend the system then.
Example 2: Avoiding Unnecessary Features
Non-YAGNI Approach:
Developing a feature for exporting reports in five different formats when the client has asked for only one specific format.
YAGNI Approach:
You focus on creating a robust and efficient export feature for the requested format. If the need for additional formats arises later, they can be added at that time.
Tips for Practicing YAGNI
- Focus on Requirements: Always align your development efforts with the current requirements, not on what you think might be needed in the future.
- Refactor When Needed: Apply YAGNI in conjunction with refactoring. If a new requirement arises, refactor your code to accommodate it.
- Continuous Feedback: Regularly communicate with stakeholders to ensure that what is being developed is what is actually needed.
- Avoid Speculative Generality: Do not generalize the solution for potential future problems. Keep solutions specific to the problem at hand.
Conclusion
The YAGNI principle is a powerful tool in the arsenal of a software developer. It encourages simplicity and efficiency, reminding us to focus on what is needed now rather than getting lost in the complexities of what might be needed in the future. By adhering to YAGNI, developers can create software that is not only easier to maintain and extend but also delivers value faster to the end user.
Design Patterns
Design Patterns are general, reusable solutions to common problems that arise during the design and development of software. They represent best practices for solving certain types of problems and provide a way for developers to communicate about effective design solutions. They are not a finished design, but rather a template to solve a problem in many different situations.
Benefits of Design Patterns include:
- Making code reusable, bug-free, and clean.
- Speeding up the development process.
- Making changes or modifications easier.
- Reducing common problems developers face during the development process.
- Improving object-oriented skills.
- Making the flow of code easy to understand.
Classifications
Design Patterns are categorized mainly into three categories:
Creational Design Pattern: Abstracts the instantiation process, making a system independent of how its objects are created, composed, and represented.
Structural Design Pattern: Concerned with how classes and objects are composed to form larger structures. Structural class patterns use inheritance to compose interfaces or implementations.
Behavioral Design Pattern: Concerned with algorithms and the assignment of responsibilities between objects. Behavioral patterns describe not just patterns of objects or classes but also the patterns of communication between them.
Definitions of all Design Patterns
- Creational Design Patterns:
o Factory Method: Allows us to create objects without specifying their concrete type.
o Abstract Factory: Provides an interface to create families of related or dependent objects without specifying their concrete classes.
o Singleton: Ensures that only one instance of an object is created.
o Prototype: Used to create a new object from an existing object.
o Builder: Used to construct a complex object step by step.
- Structural Design Patterns:
o Adapter: Allows two incompatible classes to work together by wrapping an interface around one of the existing classes.
o Bridge: Decouples an abstraction so that two classes can vary independently.
o Composite: Wraps a group of objects into a single object.
o Decorator: Extends the object behavior dynamically at runtime.
o Facade: Offers a simple interface to more complex underlying objects. The single interface represent entire system like Logger.
o Flyweight: Decreases the cost of complex object models.
o Proxy: Reduces the cost, reduces complexity, and provides a placeholder interface to an underlying object to control access.
o
- Behavioral Design Patterns:
o Chain Of Responsibility: Passes the command to a chain of processing objects.
o Command: Generates objects which encapsulate actions and parameters.
o Interpreter: Implements a specialized language.
o Iterator: Accesses all the elements of an object sequentially without violating its underlying representation.
o Mediator: Provides loose coupling between classes by being the only class that has detailed knowledge of their methods.
o Memento: Restores an object to its previous state.
o Observer: Allows a number of observer objects to see an event.
o State: Allows an object to modify its behavior when its internal states change.
o Strategy: Defines a family of algorithms, encapsulates each one, and makes them interchangeable.
o Template Method: Defines the skeleton of an algorithm in an operation, deferring some steps to subclasses.
o Visitor: Represents an operation to be performed on the elements of an object structure.
Here's are patterns with examples in C#:
Creational Patterns:
Singleton
Ensures only one instance of a class exists.
Feature:
Global access point, controlled creation.
Use Case:
Logging, configuration, thread pool.
C# Example:
public sealed class Logger
{
    private static Logger instance = new Logger();
    private Logger() {}
    public static Logger Instance { get { return instance; } }
    public void LogMessage(string message) {  }
}
the Singleton pattern example provided earlier isn't thread-safe. Here's a breakdown of the issue and a thread-safe solution:
Problem:
- The private static Logger instance = new Logger(); line creates the instance during class loading, which is thread-safe.
- However, the public static Logger Instance { get { return instance; } } property doesn't guarantee thread safety when multiple threads access it simultaneously.
Key Methods for Thread Safety:
Locking: Use the lock keyword to create a critical section, ensuring only one thread can access a shared resource at a time.
public static Logger Instance

{

    get

    {

        lock (syncLock) // Use a static object for locking

        {

            if (instance == null)

            {

                instance = new Logger();

            }

            return instance;

        }

    }

}
Readonly: The Logger instance is created as a static readonly field. This means it is initialized when the class is first loaded, which is guaranteed to be thread-safe by the .NET runtime. This is often referred to as “eager initialization” and it ensures that the Singleton instance is created before any thread can access the Instance property.
public sealed class Logger
{

    private static readonly Logger instance = new Logger();

    private Logger() {}

    public static Logger Instance { get { return instance; } }

    public void LogMessage(string message) {  }
}
Static Constructor: Initialize the Singleton instance in a static constructor, which is thread-safe.
private static readonly Logger instance = new Logger();
static Logger() // Static constructor for thread-safe initialization
{
**// Perform any necessary initialization**
}
Lazy Initialization: Use the Lazy
private static readonly Lazy
Factory Method
Defines an interface for creating objects, letting subclasses decide which class to instantiate.
Feature:
Defer object creation to subclasses.
Use Case:
Creating different product types based on configuration.
C# Example:
public interface IProductFactory
{

    Product CreateProduct();
}

public class ConcreteProductFactory : IProductFactory
{
    public Product CreateProduct()
    {

        return new ConcreteProduct();
    }
}
Abstract Factory
Provides an interface for creating families of related objects without specifying their concrete classes.
Feature:
Create objects without knowing their concrete classes.
Use Case:
Creating UI elements for different platforms.
C# Example:
public interface IGUIFactory

{

    Button CreateButton();

    TextBox CreateTextBox();

}
Prototype
Creates new objects by cloning an existing prototype, avoiding costly initialization processes.
Feature:
Efficient object creation without calling constructors.
Use Case:
Cloning complex objects, object pooling.
C# Example:
public interface IPrototype

{

    IPrototype Clone();

}

public class ConcretePrototype : IPrototype

{

    public int Value { get; set; }

    public IPrototype Clone()

    {

        return (IPrototype)MemberwiseClone();

    }

}
Deep cloning in the Prototype pattern refers to creating a completely independent copy of an object, including all its nested objects and references. This contrasts with shallow cloning, which only copies top-level members, often resulting in shared references to the same nested objects.
public class ConcretePrototype : IPrototype

{

    public string Name { get; set; }

    public List<AnotherPrototype> Children { get; set; }

    public object Clone()

    {

        // Deep clone using serialization

        var formatter = new BinaryFormatter();

        using (var stream = new MemoryStream())

        {

            formatter.Serialize(stream, this);

            stream.Position = 0;

            return formatter.Deserialize(stream);

        }

    }

}
Key Points:
- Serialization: The example uses serialization for deep cloning, which handles complex object graphs effectively.
- Custom Cloning: For simpler cases or specific needs, you can manually create new instances and copy values for deep cloning.
- Caution: Consider potential performance implications of serialization for large objects or frequent cloning.
- Alternatives: Explore libraries like AutoMapper or frameworks like JSON.NET for alternative deep cloning approaches.
When to Use Deep Cloning:
- When you need independent copies of objects with their own state and references.
- When modifying a cloned object shouldn't affect the original or other clones.
- When dealing with complex object graphs to ensure complete duplication.
By employing deep cloning in the Prototype pattern, you can create truly independent copies of objects, enhancing flexibility and data integrity in your applications.
Builder
Separates the construction of a complex object from its representation, allowing for different construction processes.
Feature:
Step-by-step object construction, different representations.
Use Case:
Building complex objects with many options, XML parsing.
C# Example:
public class CarBuilder

{

    private Car car = new Car();

    public CarBuilder SetColor(string color) { car.Color = color; return this; }

    public CarBuilder SetWheels(int wheels) { car.Wheels = wheels; return this; }

    public Car Build() { return car; }

}
Structural Patterns
Adapter
Converts the interface of one class into another expected by the client.
Feature:
Makes incompatible interfaces compatible.
Use Case:
Integrating third-party libraries with different APIs.
C# Example:
public class Adapter : ITarget
{
    private Adaptee adaptee = new Adaptee();

    public void Request()
    {
        adaptee.SpecificRequest();
    }
}
Decorator
Dynamically adds responsibilities to objects without modifying their structure.
Feature:
Extend functionality without subclassing.
Use Case:
Adding logging or caching to existing objects.
C# Example:
public abstract class DecoratorStream : Stream
{
    protected Stream stream;
    public DecoratorStream(Stream stream)
    {
        this.stream = stream;
    }
}
Façade
Provides a simplified interface to a complex subsystem, making it easier to use.
Feature:
Hides subsystem complexity, promotes loose coupling.
Use Case:
Simplifying interactions with external systems or libraries.
C# Example:
public class CarFacade

{

    private Engine engine = new Engine();

    private Wheels wheels = new Wheels();

    public void Start()

    {

        engine.Start();

        wheels.StartRolling();

    }

}
Proxy
Provides a surrogate or placeholder for another object, controlling access to it.
Feature:
Protection, remote access, lazy loading.
Use Case:
Access control, virtual proxies, remote proxies.
C# Example:
public class ExpensiveObjectProxy : IExpensiveObject

{

    private ExpensiveObject expensiveObject;

    public string GetData()

    {

        if (expensiveObject == null)

            expensiveObject = new ExpensiveObject();

        return expensiveObject.GetData();

    }

}
Behavioral Patterns
Observer
Defines a one-to-many dependency between objects so that when one object changes state, all its dependents are notified.
Feature:
Loose coupling between subjects and observers.
Use Case:
Event notification systems, stock market updates.
C# Example:
public interface IObserver
{
    void Update(object sender, EventArgs e);
}

public class Subject
{
    private List<IObserver> observers = new List<IObserver>();
    public void Attach(IObserver observer) {  }

    public void Detach(IObserver observer) {  }
    public void Notify() {  }
}
Strategy
Encapsulates algorithms in interchangeable classes, letting algorithms vary independently from clients that use them.
Feature:
Choose algorithms at runtime.
Use Case:
Sorting algorithms, compression techniques.
C# Example:
public interface ISortingStrategy
{
    void Sort(int[] numbers);
}

public class BubbleSortStrategy : ISortingStrategy
{

    public void Sort(int[] numbers) { ... }
}

public class MergeSortStrategy : ISortingStrategy
{

    public void Sort(int[] numbers) { ... }
}
Chain of Responsibility
Chains objects together and passes a request along the chain until an object handles it.
Feature:
Decoupling sender and receiver, multiple handlers.
Use Case:
Logging systems, multi-level authentication.
C# Example:
public abstract class Handler

{

    protected Handler nextHandler;

    public void SetNext(Handler nextHandler) { this.nextHandler = nextHandler; }

    public abstract void HandleRequest(Request request);

}
Mediator
Defines an object that encapsulates how a set of objects interact, promoting loose coupling.
Feature:
Decouples colleagues, centralizes communication.
Use Case:
Chat rooms, air traffic control systems.
C# Example:
public class ChatRoomMediator

{

    private List<User> users = new List<User>();

    public void Send(User user, string message)

    {

        foreach (User recipient in users)

        {

            if (recipient != user)

                recipient.Receive(message);

        }

    }

}
Visitor
Separates an algorithm from the object structure it operates on, allowing the algorithm to be applied to different object structures.
Feature:
Adding new operations without modifying classes.
Use Case:
Adding new operations to composite structures, AST traversal.
C# Example:
public interface ICarElementVisitor

{

    void Visit(Engine engine);

    void Visit(Wheel wheel);

}

public class CarElementVisitor : ICarElementVisitor

{

    public void Visit(Engine engine) { ... }

    public void Visit(Wheel wheel) { ... }

}

public abstract class Part

{

    public abstract void Accept(ICarElementVisitor visitor);

}

public class Engine : Part

{

    public override void Accept(ICarElementVisitor visitor)

    {

        visitor.Visit(this);

    }

}

public class Wheel: Part

{

    public override void Accept(ICarElementVisitor visitor)

    {

        visitor.Visit(this);

    }

}