The bad old days
Applications run businesses. If applications break, businesses break. Sometimes they
even go bust. These statements get truer every day!
Most applications run on servers. And in the past, we could only run one application
per server. The open-systems world of Windows and Linux just didn’t have the
technologies to safely and securely run multiple applications on the same server. Every time the business needed a
new application, IT would go out and buy a new server. And most of the time nobody
knew the performance requirements of the new application! This meant IT had to
make guesses when choosing the model and size of servers to buy.
As a result, IT did the only thing it could do — it bought big fast servers with lots of
resiliency. After all, the last thing anyone wanted, including the business, was under-powered servers. Under-powered servers might be unable to execute transactions,
which might result in lost customers and lost revenue. So, IT usually bought big.
This resulted in huge numbers of servers operating as low as 5-10% of their potential
capacity. A tragic waste of company capital and resources!
Hello VMware!
Amid all of this, VMware, Inc. gave the world a gift — the virtual machine (VM).
And almost overnight, the world changed into a much better place! We finally had a technology that would let us safely and securely run multiple business applications
on a single server. Cue wild celebrations!
This was a game changer! IT no longer needed to procure a brand new oversized
server every time the business asked for a new application. More often than not,
they could run new apps on existing servers that were sitting around with spare
capacity.
All of a sudden, we could squeeze massive amounts of value out of existing corporate
assets, such as servers, resulting in a lot more bang for the company’s buck ($).
VM warts
But… and there’s always a but! As great as VMs are, they’re far from perfect!
The fact that every VM requires its own dedicated OS is a major flaw. Every OS
consumes CPU, RAM and storage that could otherwise be used to power more
applications. Every OS needs patching and monitoring. And in some cases, every
OS requires a license. All of this is a waste of op-ex and cap-ex.
The VM model has other challenges too. VMs are slow to boot, and portability
isn’t great — migrating and moving VM workloads between hypervisors and cloud
platforms is harder than it needs to be.
Hello Containers!
For a long time, the big web-scale players, like Google, have been using container
technologies to address the shortcomings of the VM model.
In the container model, the container is roughly analogous to the VM. The major
difference is that every container does not require its own full-blown OS. In fact, all
containers on a single host share a single OS. This frees up huge amounts of system
resources such as CPU, RAM, and storage. It also reduces potential licensing costs
and reduces the overhead of OS patching and other maintenance. Net result: savings
on the cap-ex and op-ex fronts.
Containers are also fast to start and ultra-portable. Moving container workloads from
your laptop, to the cloud, and then to VMs or bare metal in your data center, is a
breeze.
The Container is a wrapper of system process.
Windows containers vs Linux containers
It’s vital to understand that a running container shares the kernel of the host machine
it is running on. This means that a containerized app designed to run on a host with
a Windows kernel will not run on a Linux host. This means that you can think of it
like this at a high level — Windows containers require a Windows Host, and Linux
containers require a Linux host. However, it’s not that simple…
At the time of writing, it is possible to run Linux containers on Windows machines.
For example, Docker for Windows (a product offering from Docker, Inc. designed for
Windows 10) can switch modes between Windows containers and Linux containers.
This is an area that is developing fast and you should consult the Docker documenatation for the latest.
Docker
Docker is software that runs on Linux and Windows kernels. It creates, manages and
orchestrates containers. The software is developed in the open as part of the Moby
open-source project on GitHub.
Docker uses a client-server architecture. The Docker client talks to the Docker daemon, which does the heavy lifting of building, running, and distributing your Docker containers. The Docker client and daemon can run on the same system, or you can connect a Docker client to a remote Docker daemon.


When you install Docker, you get two major components:
- The Docker client.
- The Docker daemon (sometimes called “server” or “engine”).
The Docker Engine is the infrastructure plumbing software that runs and orchestrates
containers. The Docker Engine is the core container runtime that runs containers.
Images
It’s useful to think of a Docker image as an object that contains an OS filesystem
and an application. If you work in operations, it’s like a virtual machine template. An image contains enough of an operating
system (OS), as well as all the code and dependencies to run whatever application
it’s designed for.
Images are made up of multiple layers that get stacked on top of each other and
represented as a single object. Inside of the image is a cut-down operating system
(OS) and all of the files and dependencies required to run an application. Because
containers are intended to be fast and lightweight, images tend to be small. As a result, images and layers are immutable,
and we can easily identify any changes made to either.
Containers
Now that we have an image pulled locally, we can use the docker container run
command to launch a container from it.
For Linux:
docker container run -it ubuntu:latest /bin/bash
The docker container run tells
the Docker daemon to start a new container. The -it flags tell Docker to make
the container interactive and to attach our current shell to the container’s terminal
(we’ll get more specific about this in the chapter on containers).
The
container engine then takes OS resources such as the process tree, the filesystem,
and the network stack, and carves them up into secure isolated constructs called
containers. Each container looks smells and feels just like a real OS. Inside of each
container we can run an application.
The lifecycle of a container… You can stop, start, pause, and restart
a container as many times as you want. And it’ll all happen really fast. But the
container and its data will always be safe. It’s not until you explicitly delete a
container that you run any chance of losing its data. And even then, if you’re storing
container.
Attaching to running containers
You can attach your shell to the terminal of a running container with the docker
container exec command.
Self-healing containers with restart policies
It’s often a good idea to run containers with a restart policy. It’s a form of self-healing
that enables Docker to automatically restart them after certain events or failures have
occurred.
Restart policies are applied per-container, and can be configured imperatively on
the command line as part of docker-container run commands, or declaratively in
Compose files for use with Docker Compose and Docker Stacks.
At the time of writing, the following restart policies exist:
• always
• unless-stopped
• on-failed
The always policy is the simplest. It will always restart a stopped container unless
it has been explicitly stopped, such as via a docker container stop command. An
easy way to demonstrate this is to start a new interactive container with the --
restart always policy, and tell it to run a shell process. When the container starts
you will be attached to its shell.
Dockerfile
Dockerfile containing instructions on how to build the app into a Docker
image.
Use the docker image build command to create a new image using the instructions
in the Dockerfile.

The build process used by Docker has the concept of a cache. The best way to
see the impact of the cache is to build a new image on a clean Docker host, then repeat the same build immediately after. The first build will pull images and take
time building layers. The second build will complete almost instantaneously. This is
because artefacts form the first build, such as layers, are cached and leveraged by
later builds.
s we know, the docker image build process iterates through a Dockerfile one-line at-a-time starting from the top. For each instruction, Docker looks to see if it already
has an image layer for that instruction in its cache. If it does, this is a cache hit and
it uses that layer. If it doesn’t, this is a cache miss and it builds a new layer from the
instruction. Getting cache hits can hugely speed up the build process.
Docker Compose
Deploying and managing lots of services can be hard. This is where Docker Compose
comes in to play.
Instead of gluing everything together with scripts and long docker commands,
Docker Compose lets you describe an entire app in a single declarative configuration
file. You then deploy it with a single command.
Once the app is deployed, you can manage its entire lifecycle with a simple set of
commands. You can even store and manage the configuration file in a version control
system!
Compose uses YAML files to define multi-service applications. YAML is a subset of
JSON, so you can also use JSON. However, all of the examples in this chapter will be
YAML.
The default name for the Compose YAML file is docker-compose.yml. However, you
can use the -f flag to specify custom filenames.
Using docker compose, we can deploy multiple isolated environments like dev and test into docker.
Service discovery
Service discovery allows an application or component to discover information about their environment and neighbors.
Volumes and persistent data
There are two main categories of data. Persistent and non-persistent.
Persistent is the stuff you need to keep. Things like; customer records, financials,
bookings, audit logs, and even some types of application log data. Non-persistent is
the stuff you don’t need to keep.
Both are important, and Docker has options for both.
Every Docker container gets its own non-persistent storage. It’s automatically
created, alongside the container, and it’s tied to the lifecycle of the container. That
means deleting the container will delete this storage and any data on it.
If you want your container’s data to stick around (persist), you need to put it on a
volume. Volumes are decoupled from containers, meaning you create and manage
them separately, and they’re not tied to the lifecycle of any container. Net result, you
can delete a container with a volume, and the volume will not be deleted.
The recommended way to persist data in containers is with volumes.
At a high-level, you create a volume, then you create a container, and you mount the
volume into it. The volume gets mounted to a directory in the container’s filesystem,
and anything written to that directory is written to the volume. If you then delete
the container, the volume and its data will still exist.
Integrating Docker with external storage systems makes it easy to share the external
storage between cluster nodes. A major concern with a configuration like this is data corruption.
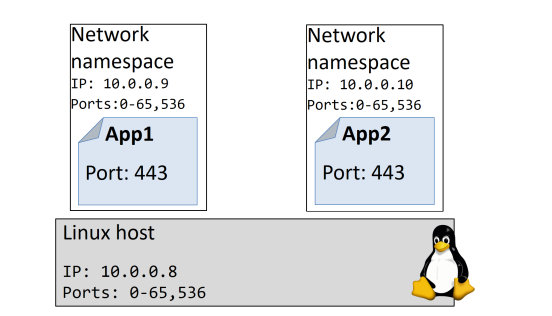
Namespaces
Kernel namespaces are at the very heart of containers! They let us slice up an
operating system (OS) so that it looks and feels like multiple isolated operating
systems. This lets us do really cool things like run multiple web servers on the same
OS without having port conflicts. It also lets us run multiple apps on the same OS
without them fighting over shared config files and shared libraries.
A couple of quick examples:
• You can run multiple web servers, each on port 443, on a single OS. To do this
you just run each web server app inside of its own network namespace. This
works because each network namespace gets its own IP address and full range
of ports. You may have to map each one to a separate port on the Docker host,
but each can run without being re-written or reconfigured to use a different
port.
• You can run multiple applications, each requiring their own particular version
of a shared library or configuration file. To do this you run each application
inside of its own mount namespace. This works because each mount namespace can have its own isolated copy of any directory on the system (e.g. /etc,
/var, /dev etc.).
Control Groups
If namespaces are about isolation, control groups (cgroups) are about setting limits.
Think of containers as similar to rooms in a hotel. Yes, each room is isolated, but each
room also shares a common set of resources — things like water supply, electricity
supply, shared swimming pool, shared gym, shared breakfast bar etc. Cgroups let us
set limits so that (sticking with the hotel analogy) no single container can use all of
the water or eat everything at the breakfast bar.
In the real world, not the silly hotel analogy, containers are isolated from each other
but all share a common set of OS resources — things like CPU, RAM and disk I/O.
Cgroups let us set limits on each of these so that a single container cannot use all of
the CPU, RAM, or storage I/O of the host.