Kubernetes background
Kubernetes is an open-source container orchestration system for automating the deployment, scaling, and management of containerized applications. It was originally developed by Google and is now maintained by the Cloud Native Computing Foundation (CNCF). Kubernetes provides a platform-agnostic way to manage, and schedule containerized workloads, making it easier to run and manage microservices-based applications in a distributed environment, including:
Automatic scaling: Kubernetes can automatically scale the number of replicas of a containerized application based on demand, ensuring that the application can handle increased traffic without manual intervention.
Self-healing: Kubernetes can automatically detect and replace failed containers, ensuring that the application remains available even in the face of failures.
Service discovery and load balancing: Kubernetes can automatically discover and route traffic to the correct containerized service, making it easy to build and run microservices-based applications.
Storage orchestration: Kubernetes can automatically provision, scale, and manage storage for containerized applications.
Rolling updates: Kubernetes can automatically roll out updates to containerized applications with zero-downtime, making it easy to deploy new versions of an application without impacting its availability.
In summary, Kubernetes provides a high-level abstraction for running and managing containerized applications across multiple hosts, making it easier to build, test, and deploy microservices-based applications in a distributed environment.
Kubernetes and Docker
The first thing to say about Kubernetes and Docker is that they’re complimentary technologies. For example, it’s very popular to deploy Kubernetes with Docker as the container runtime. This means Kubernetes orchestrates one or more hosts that run containers, and Docker is the technology that starts, stops, and otherwise manages the containers. In this model, Docker is a lower-level technology that is orchestrated and managed by Kubernetes.
To make this all happen, we start out with our app, package it up and give it to the cluster (Kubernetes). The cluster is made up of one or more masters, and a bunch of nodes. The masters are in-charge of the cluster and make all the decisions about which nodes to schedule application services on. They also monitor the cluster, implement changes, and respond to events. For this reason, we often refer to the master as the control plane. Then the nodes are where our application services run. They also report back to the masters and watch for changes to the work they’ve been scheduled.
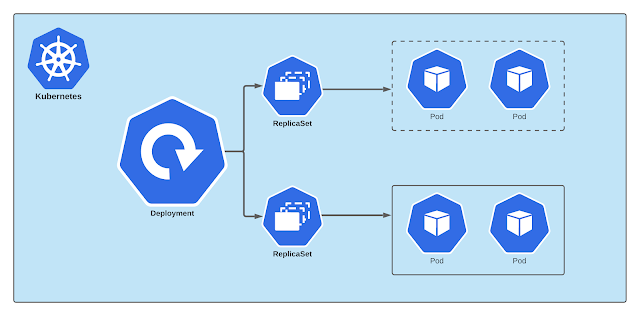
With Deployments, we start out with our application code and we containerize it. Then we define it as a Deployment via a YAML or JSON manifest file. This manifest file tells Kubernetes two important things:
- What our app should look like – what images to use, ports to expose, networks to join, how to perform update etc.
- How many replicas of each part of the app to run (scale).
Then we give the file to the Kubernetes master which takes care of deploying it on the cluster. But it doesn’t stop there. Kubernetes is constantly monitoring the Deployment to make sure it is running exactly as requested. If something isn’t as it should be, Kubernetes tries to it.
Docker is a platform for developing, shipping, and running containerized applications, while Kubernetes is a platform for automating the deployment, scaling, and management of containerized applications.
Docker provides a simple way to package and distribute applications as containers, which are lightweight, portable, and self-sufficient units of software that include all the necessary dependencies to run an application.
Kubernetes, on the other hand, provides a powerful orchestration system for managing and scheduling containerized workloads, making it easier to run and manage microservices-based applications in a distributed environment. It provides a number of features such as automatic scaling, self-healing, service discovery, load balancing, storage orchestration, and rolling updates, which are not available in Docker.
In short, Docker provides a way to package and distribute applications as containers, while Kubernetes provides a way to manage and orchestrate those containers in a production environment. While it's possible to run containerized applications using only Docker, the use of Kubernetes will make it easier to manage and scale the application in a production environment.
Masters and nodes
A Kubernetes cluster is made up of masters and nodes.
Masters (control plane)
A Kubernetes master is a collection of small services that make up the control plane of the cluster. The simplest (and most common) setups run all the master services on a single host. However, multi-master HA is becoming more and more popular, and is a must have for production environments. Looking further into the future, we might see the individual services comprise the control plane split-out and distributed across the cluster - a distributed control plane.
It’s also considered a good practice not to run application workloads on the master. This allows the master to concentrate entirely on looking after the state of the cluster.
The API server
The API Server (apiserver) is the frontend into the Kubernetes control plane. It exposes a RESTful API that preferentially consumes JSON. We POST manifest files to it, these get validated, and the work they define gets deployed to the cluster. You can think of the API server as the brains of the cluster.
The cluster store
If the API Server is the brains of the cluster, the cluster store is its memory. The config and state of the cluster gets persistently stored in the cluster store, which is the only stateful component of the cluster and is vital to its operation - no cluster store, no cluster!
The cluster store is based on etcd, the popular distributed, consistent and watchable key-value store. As it is the single source of truth for the cluster, you should take care to protect it and provide adequate ways to recover it if things go wrong.
The controller manager
The controller manager (kube-controller-manager) is currently a bit of a monolith - it implements a few features and functions that’ll probably get split out and made pluggable in the future. Things like the node controller, endpoints controller, namespace controller etc. They tend to sit in loops and watch for changes – the aim of the game is to make sure the current state of the cluster matches the desired state (more on this shortly).
The scheduler
The scheduler (kube-scheduler) watches for new workloads/Pods and assigns them to nodes. Behind the scenes, it does a lot of related tasks such as evaluating affinity and anti-affinity, constraints, and resource management. evaluating affinity and anti-affinity, constraints, and resource management.

The Kubernetes control plane which controls the entire cluster. A cluster must have at least one master node; there may be two or more for redundancy. Components of the master node include the API Server, etcd (a database holding the cluster state), Controller Manager, and Scheduler.

Nodes
A Kubernetes node is a machine that runs containerized workloads as part of a Kubernetes cluster. A node can be a physical machine or a virtual machine, and can be hosted on-premises or in the cloud.
A Kubernetes node is a single machine in a cluster that serves as an abstraction. Instead of managing specific physical or virtual machines, you can treat each node as pooled CPU and RAM resources on which you can run containerized workloads. When an application is deployed to the cluster, Kubernetes distributes the work across the nodes. Workloads can be moved seamlessly between nodes in the cluster.
The nodes are a bit simpler than masters. The only things that we care about are the kubelet, the container runtime, and the kube-proxy.

Kubelet
Container runtime
Kube-proxy
Pods

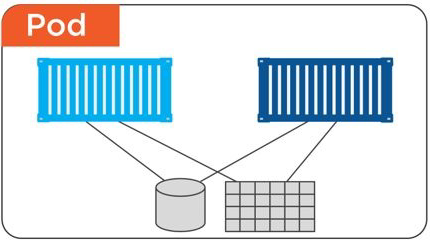
Pod anatomy

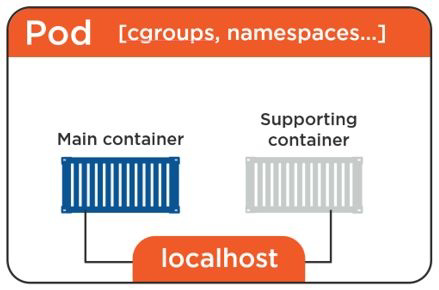

This Pod networking model makes inter-Pod communication really simple. Every Pod in the cluster has its own IP addresses that’s fully routable on the Pod overlay network.

Pod lifecycle

Deploying Pods via ReplicaSets
Services


Connecting Pods to Services


Common Service types


Deployments
Pods and cgroups
Labels and Selectors
DaemonSets
- When a new node is added to a Kubernetes cluster, a new pod will be added to that newly attached node.
- When a node is removed, the DaemonSet controller ensures that the pod associated with that node is garbage collected. Deleting a DaemonSet will clean up all the pods that DaemonSet has created.
Jobs

One Shot
Parallelism
Work Queues
ConfigMaps and Secrets
ConfigMaps
Filesystem
Environment variable
Command-line argument
Secrets
Namespaces
Kubernetes starts with four initial namespaces:
default- Kubernetes includes this namespace so that you can start using your new cluster without first creating a namespace.
kube-node-lease- This namespace holds Lease objects associated with each node. Node leases allow the kubelet to send heartbeats so that the control plane can detect node failure.
kube-public- This namespace is readable by all clients (including those not authenticated). This namespace is mostly reserved for cluster usage, in case that some resources should be visible and readable publicly throughout the whole cluster. The public aspect of this namespace is only a convention, not a requirement.
kube-system- The namespace for objects created by the Kubernetes system.
- When you create a Service, it creates a corresponding DNS entry. This entry is of the form
<service-name>.<namespace-name>.svc.cluster.local, which means that if a container only uses<service-name>, it will resolve to the service which is local to a namespace. This is useful for using the same configuration across multiple namespaces such as Development, Staging and Production. If you want to reach across namespaces, you need to use the fully qualified domain name (FQDN). Volumes
A Volume references a storage location. It must have a unique name. It is Attached to a Pod and may or may not be tied to the Pod's lifetime (depending on the Volume type). A Volume Mount references a Volume by name and defines a mountPath. A Volume can be used to hold data and state for Pods and containers.
Namespaces and DNS
Volume Types
- emptyDir - Empty directory for storing "transient"data (shares a Pod's lifetime) useful for sharing files between containers running in a Pod. Data will lose if Pod gets down.
- hostPath - Pod mounts into the node's file system. Data will lose if Node gets down.
- nfs - An NFS (Network File System) share mounted into the Pod.
- configMap/secret - Special types of volumes that provide a Pod with access to Kubernetes resources
- persistentVolumeClaim - Provides Pods with amore persistent storage option that is abstracted from the details
- Cloud - Cluster-wide storage.

Persistent Volumes
- Persistent volume (PV) is a piece of storage provided by an administrator in a Kubernetes cluster with a lifecycle independent from a Pod. When a developer needs persistent storage for an application in the cluster, they request that storage by creating a persistent volume claim (PVC) and then mounting the volume to a path in the pod.

- Once that is done, the pod claims any volume that matches its requirements (such as size, access mode, and so on). An administrator can create multiple PVs with different capacities and configurations. It is up to the developer to provide a PVC for storage, and then Kubernetes matches a suitable PV with the PVC. If there is no PV to match the PVC, the StorageClass dynamically creates a PV and binds it to the PVC. The value specified in the MountOptions key will be used when creating dynamic PVs.
- A StorageClass (SC) is a type of storage template that can be used to dynamically provision storage.
Readiness, liveness and Startup probes
What is Ingress?
Ingress exposes HTTP and HTTPS routes from outside the cluster to services within the cluster. Traffic routing is controlled by rules defined on the Ingress resource.
Here is a simple example where an Ingress sends all its traffic to one Service:

An Ingress may be configured to give Services externally-reachable URLs, load balance traffic, terminate SSL / TLS, and offer name-based virtual hosting. An Ingress controller is responsible for fulfilling the Ingress, usually with a load balancer, though it may also configure your edge router or additional frontends to help handle the traffic.
An Ingress does not expose arbitrary ports or protocols. Exposing services other than HTTP and HTTPS to the internet typically uses a service of type Service.Type=NodePort or Service.Type=LoadBalancer.
Prerequisites
You must have an Ingress controller to satisfy an Ingress. Only creating an Ingress resource has no effect.
You may need to deploy an Ingress controller such as ingress-nginx. You can choose from a number of Ingress controllers.
Ideally, all Ingress controllers should fit the reference specification. In reality, the various Ingress controllers operate slightly differently.
n Kubernetes, both ingress and load balancer services are used to route incoming traffic to different services within a cluster, but they serve slightly different purposes:
Load balancer service: A load balancer service is a Kubernetes object that creates a load balancer in the underlying infrastructure (e.g., cloud provider) and directs incoming traffic to a specific service within the cluster. A load balancer service is typically used to distribute traffic to a service that is running on multiple replicas, to improve the performance and availability of the service.
Ingress: An ingress is a Kubernetes object that allows you to route incoming traffic to different services within a cluster based on the URL path or hostname. It allows you to expose multiple services under a single IP address and domain name. Ingress provides more flexibility and control over how traffic is directed to different services, and can be used for advanced routing, improved security and performance.
In summary, Load balancer service is a Kubernetes object that creates a load balancer and directs traffic to a specific service, while ingress is a Kubernetes object that allows you to route incoming traffic to different services based on the URL path or hostname, and expose multiple services under a single IP address and domain name.
Performing a Rolling Update
Users expect applications to be available all the time and developers are expected to deploy new versions of them several times a day. In Kubernetes this is done with rolling updates. Rolling updates allow Deployments' update to take place with zero downtime by incrementally updating Pods instances with new ones. The new Pods will be scheduled on Nodes with available resources.
Rolling updates allow the following actions:
- Promote an application from one environment to another (via container image updates)
- Rollback to previous versions
- Continuous Integration and Continuous Delivery of applications with zero downtime
To rollback a rolling update in Kubernetes, you can use the kubectl rollout undo command with the name of your deployment. For example, if your deployment is called nginx-deployment, you can run:
kubectl rollout undo deployment/nginx-deployment
You can also specify a revision number to rollback to a specific version of your deployment. For example, if you want to rollback to revision 2, you can run:
kubectl rollout undo deployment/nginx-deployment --to-revision=2